


Once you get past the initial quick start setup of the Canon EOS 5D Mark II, capturing pictures in auto mode is a breeze. But what do you do after you've snapped those photos? This quick guide will show you the easy steps to viewing your images directly on the camera.
Step 1 Playback Button
To see the last photograph you took, make sure your camera is turned on and simply press the Playback button located right above the Erase button with the trashcan icon. It's by the lower left of the LCD monitor and looks much like any other play button, an isosceles triangle tipped on its side with the apex facing right, which looks something like this: [>]
Step 2 Display View
Once pressed, the monitor will display the last image taken and recorded onto your memory card, or the last image you previously viewed. If you have an empty CF card, then it will just say "No Image".
Tip
- If you most recently used index mode (discussed in Step 5 below) to view your images, it will initially show that instead of a single picture.
Step 3 Browsing Images
Use the QCD (Quick Control Dial) to scroll through all of your images, spinning it counterclockwise to go from newest to oldest, and clockwise for oldest to newest.
Step 4 Image Jump with Main Dial
Instead of scrolling through one image at a time, you can skip by 10s or 100s using the Main Dial by the Shutter button. The factory setting is 10, but you can change it to any of the options below by pressing the Menu button and using the Multi-controller (the joystick looking knob) to choose the third tab (Playback 2). Use the QCD to scroll to "Image Jump w/ Main Dial" and press the Set button.
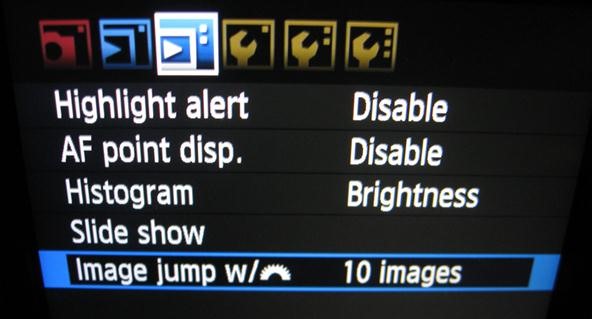
Select your choice and press Set again to save it.

You can set 1 image, 10 images, 100 images, Screen, Date, Folder, Movies, or Stills.
Step 5 Index View
If you want to see more than one image at a time on the monitor, just press the Reduce button. Pressing it once will show four thumbnails images at a time. Pressing it again will show you nine thumbnails. To get back to the four-image index display, hit the Magnify button once, and then again to get back to single picture view.
Tips
- Clicking the Magnify button from single picture view will zoom in on the image, not change the view (discussed in Step 6 below).
- You can use both the QCD and Multi-controller to navigate through the pictures in index view.
- To skip through your images faster, use the Main Dial, which will leap forward or backward for whatever prerequisite you set in the step above.
- When an image you want to check out is highlighted by the blue box in index view, to enlarge it, hit the Magnify button until the single image fills the screen.
Step 6 Zooming In
If you want to examine a particular snapshot more closely on the full screen monitor, just make sure you're in single view mode and click the Magnify button. You can zoom in on the image between 1.5x and 10x the normal view (15 different zooms in total, not counting normal view). Obviously, pressing the Reduce button zooms back out.
Tips
- Hold down the Magnify button to quickly reach the maximum zoom. Alternately, hold the Reduce button to zoom back out fast.
- To instantly get out of zoom mode, hit the Playback button and you'll jump right back into the full screen single image view.
- Movie images can't be zoomed in on.
Step 7 Navigating Zoom
When in zoom mode, to navigate around the image use the Multi-controller.
Tip
- Using the QCD while zoomed in on a picture will skip back and forth between photos, but will remain in zoom mode. This also applied to leaping through images in zoom mode with the Main Dial.
Step 8 Rotating Images
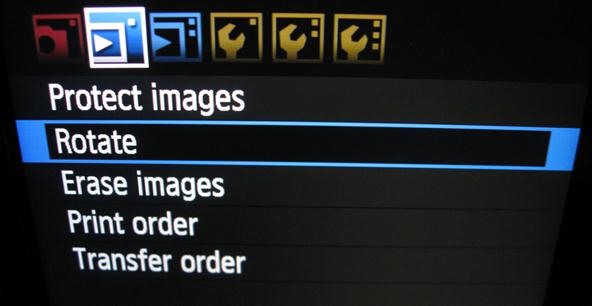
To rotate images, hit the Menu button and go to the second tab (Playback 1). Scroll down to select Rotate, then hit the Set button.
Then use the QCD to choose the image, and once you've got on, click on the Set button to rotate the image 90 degrees. Clicking it again will rotate it an additional 180 degrees (to 270 degrees) and once more will revert back to the original view (0 degrees). To rotate another image, there's no need to go back to the Menu—just use the QCD to browse through the other photos and hit the Set button to rotate them.
To exit the Rotate feature, hit the Playback button or let the monitor turn off automatically. The rotated images will be saved, and to rotate more images, you'll have to follow the whole process again.
Step 9 Auto Rotate Mode
Whenever you take a vertical photo, it will be positioned vertically when display on the monitor in Playback mode, along with on your computer (after transferring). That's because the factory setting for the 5D Mark II enables Auto Rotate for both camera and computer.
You can change this by either rotating the images individually in the step above, or by going to the fourth tab (Setup 1 - first wrench icon) in the Menu and changing the Auto Rotate preference.
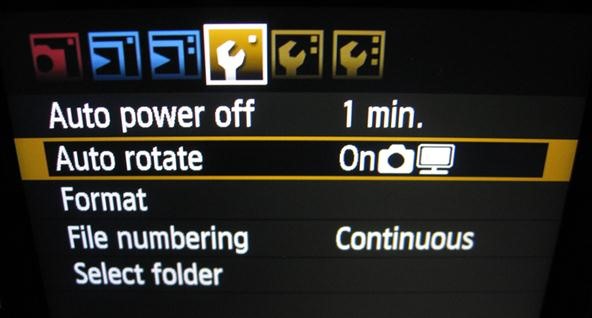
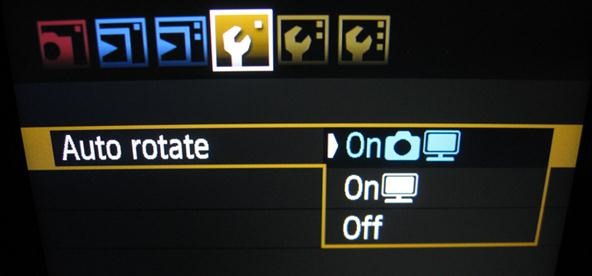
You can have it automatically rotate vertical images on your camera and computer or just on your camera. Or you can shut it off so images always fill up the full monitor LCD screen, no matter which way you shot them.
Step 10 Display Data
You'll notice some numbers on the monitor. The one in the bottom left refers to the photo your on and how many there are total. In the top right, it's the number assigned to the individual image by the CF card. The data in the top left displays the shutter speed and aperture that each photo was taken with.
This will be covered in more detail in a later article, but for now, this is all you need to know for looking at your images.
Other Viewing Options
- Deleting Images: Use the Erase button (trashcan icon) to get rid of junk pictures and clear up some more space on your CF card.
- Slideshow: You can view your images in Slideshow mode. Just go to the Menu, to the third tab (Playback 2) and select Slide Show. You can adjust your preferences and start it from there.
- Protecting Images: You can keep your images from getting deleted by using this option. Just go to the Menu, to the second tab (Playback 1) and select Protect Images. Then navigate to the ones you want to protect and hit Set for each one./
- Screen Brightness: You can adjust the brightness of the LCD by going to Menu and then the fifth tab (Setup 2) and hitting LCD Brightness.
Just updated your iPhone? You'll find new emoji, enhanced security, podcast transcripts, Apple Cash virtual numbers, and other useful features. There are even new additions hidden within Safari. Find out what's new and changed on your iPhone with the iOS 17.4 update.


Be the First to Comment
Share Your Thoughts